Finger coils are a classic hairstyle achieved through creating beautiful curl definitions using your fingers! Finger coils are perfect for both Black women and men who are natural hair enthusiasts. Moreover, this protective hairstyle is ideal for various natural hair types, be it type 3 or 4C hair. In this guide, I will provide comprehensive information about finger coils.
What Are Finger Coils?
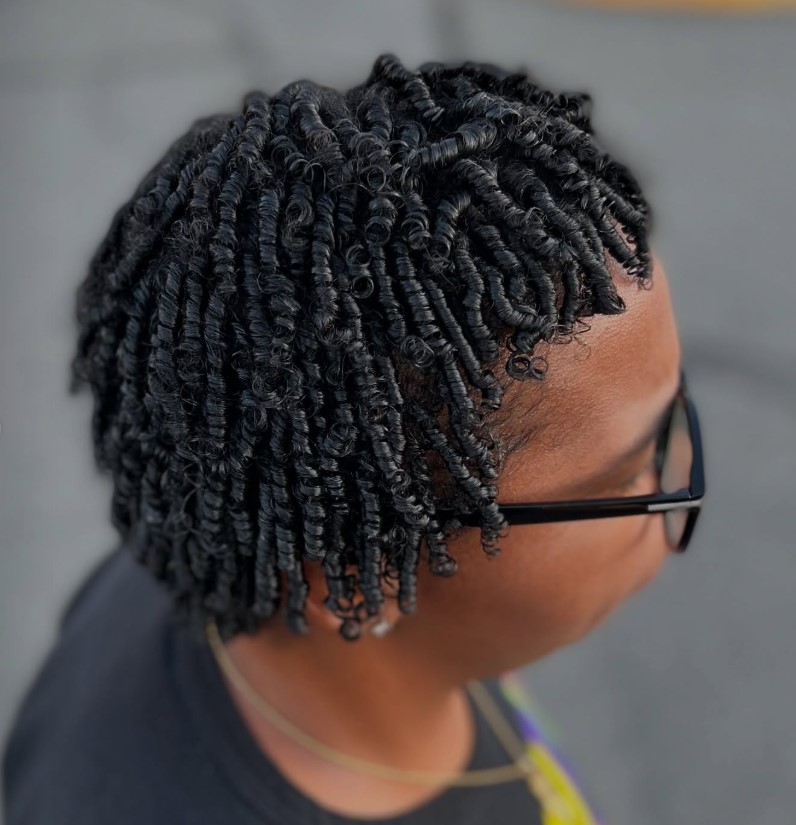
Finger coils are a styling technique that involves wrapping individual hair sections around your fingers to form uniform spiral curls. The styling method produces defined, coily hair that replicates your natural curl structure. You need only fingers, a comb, and proper hair products to achieve finger coils instead of using twist-outs or braid-outs.
How to Do Finger Coils: Step-by-Step
For defined curls, follow these steps:
1. Wash and condition: The process starts with freshly washed hair that is fully saturated. Shampoo your hair, followed by deep conditioning to often your strands. Rinse and dry your hair
2. Apply Styling Products: Apply leave-in conditioner or curl cream into your damp hair to lock in moisture. This is the point I also apply curling custard or gel. Make sure to spread your product evenly throughout your hair roots and ends.
3. Section the Hair: Section your hair into two to four large parts and secure them using clips. I find it easier to work when I divide my hair into sections. You should keep a small spray bottle available for misting your hair and keeping it damp during the styling process.
4. Twist Small Pieces: Start working with individual sections of hair by taking 1–2-inch strands. Hold the end of the strand between your thumb and forefinger before rolling it around your index finger, which faces away from your face. Start the twisting process at the roots and move down to the tip while creating a corkscrew pattern. The tightness of each coil determines both the definition strength and how long your curls will last. Remove the coil from your finger by slipping it out gently while the spiral shape remains. Carry out this process until all your hair becomes coiled. People with thick 4C hair should coil their hair in smaller sections to achieve the best possible hold, according to hair experts. As someone with 4c hair, this is what I always do.
5. Dry Completely: After coiling, leave your hair to set without disturbance. Several hours of air-drying or hooded dryer usage will speed up the drying process. Avoid touching or combing the coils while they dry because this leads to frizz formation. The coils will become completely dry after 100% drying time. To achieve better root definition, you should re-twist your coils or use a pick to carefully lift from the base of your hair.
What You’ll Need to Do Finger Coils
The following tools and products will deliver the best definition and extended longevity to your finger coils on natural hair:
Hair Products:
- Hydrating Shampoo & Conditioner: Leave-in conditioner functions as a creamy product that maintains coil softness. The curl creams from Mielle, Pattern Beauty, and Camille Rose provide nourishment to 4C hair textures.
- Curl cream or styling butter helps to define curls and improve their overall pattern.
- Styling gel or custard: The application of light to medium-hold styling gel or custard helps to set the coils. Professional curl care products include natural styling gels from Shine ‘n Jam Black Castor Flaxseed Oil Gel and Blueberry Bliss Curl Sculpting Mousse or curl-holding custards. For hair oil, use argan or castor, or jojoba oil as a moisture-sealer that gives your coils shine when they are dry.
- Edge Control (Optional): If you like sleek edges, use an edge-control gel around your hairline after coiling. Edge control is not necessary for the coils themselves, but many stylists like to recommend it for a finished look.
Tools:
• Wide-tooth comb or detangling brush – Helps smooth each section.
• Spray bottle with water – To keep hair damp while styling.
• Hair clips – To section off hair.
• Hooded dryer (optional) – Speeds up drying time.
Finger Coils on Natural, Curly, and 4C Hair
Finger coils work on every natural hair texture – from loose waves (2C/3A) to tightly coiled 4C hair. This style is a staple for all curly patterns as it adds definition to hair. I think that the kinkiest 4C hair can be coiled as long as it’s clean and moisturized. The coils in 4C hair last longer when they are small, and this results in maximum shrinkage.
With 4C or very thick hair, use a rich leave-in cream or gel to help the coils hold. I suggest a flaxseed gel to prevent coils from drying out without a crunchy texture. For 4C hair in a damp state, you don’t even need to use heavy gel, as the main requirement is that the hair is damp and you are using the right roller. The coils will not coil properly if each section of hair is not wet enough, so either use a lightweight curl cream or make sure each section is wet.
Finger coils aren’t just for women. Black men with short, curly hair can rock coils, too. The finger coil technique can be used to achieve defined curls on a short TWA or cropped afro in just a few minutes. Carol’s Daughter notes that guys with shorter hair can cut the time needed for styling in half in comparison to those with longer hair. I believe finger coils on short natural hair are one of the simplest to achieve and last up to 3 weeks. The outcome is a neat, textured look. Both women and men use the same coiling method by sectioning their hair, applying product, and then twisting the hair around their fingers.
Maintenance and Styling Tips
• Avoid Touching: Once coils are set, resist the urge to constantly play with them. Flipping or twirling your hair is forbidden by Carol’s Daughter as it leads to frizz. Try to avoid touching your hair as much as you can.
• Protect at Night: Always sleep on satin – use a bonnet, durag, or pillowcase. I use silk or satin materials to help reduce friction, which stops the coils from coming undone.
• Refresh as Needed: Finger coils are one of the easiest styles to refresh. Lightly wetting the strand and then twisting it around your finger again is the solution when a coil becomes fuzzy. The refresh process involves spraying water onto the curls, applying a bit of gel, then re-twisting to restore the curls. Applying a small amount of oil to the hair can help to smooth out the frizz.
• Limit Style Duration: Coils are longer-lasting than many other hairstyles, yet you should not wear them for extended periods. Coils that are left in for more than 3 weeks can cause matting, like when you start with locs. The best approach is to take down your coils after two or three weeks (or sooner if you notice excessive frizz) to protect the health of your hair.
• Experiment with Size: Remember, smaller coils = longer hold and more volume. If you want to achieve bigger, looser curls, just coil larger sections, but be aware that they may not last as long, naturallclub.com. A partial coil style can be achieved by coiling just the ends of your curls to achieve a softer appearance.
The versatility of finger coils allows you to create ponytails as well as half-ups and wear them completely loose. Add extra style to your look with headbands and clips as accessories. Finger coils can deliver a salon-grade, defined curl look to anyone who masters the proper technique and product selection. By following these steps, you will learn to create finger coils on your natural hair and develop a stylish, easy-to-maintain hairstyle that shows off your natural curls.